Have a look at this nice how-to:
http://www.astro.caltech.edu/~mbonati/WIRC/manual/DATARED/setting_up_no-password_ssh.html
I.e. in short:
On local side:
ssh-keygen -t dsa -f .ssh/id_dsa
cd .ssh
scp id_dsa.pub user@remote:~/.ssh/id_dsa.pub
ssh user@remote
On remote side:
cd .ssh
cat id_dsa.pub >> authorized_keys2
chmod 640 authorized_keys2
rm id_dsa.pub
exit
On a new account on the server, you might also first want to run:
remote> ssh-keygen -t dsa
This will help create the .ssh directory on the server that might otherwise be missing, and set the attributes correctly (having the directory attributes wrong is otherwise a cause of error, chaos & confusion).
Tuesday, February 5, 2008
Thursday, August 30, 2007
Various startup files
Wounder where to put you startup settings?
It depends on what you need and how it's supposed to work, but here's a few:
Per user
=====
~/.bash_profile (recommended)
~/.bashrc
~/.xprofile
System wide
========
/etc/bash.bashrc
(this is not complete, more hints wil follow)
It depends on what you need and how it's supposed to work, but here's a few:
Per user
=====
~/.bash_profile (recommended)
~/.bashrc
~/.xprofile
System wide
========
/etc/bash.bashrc
(this is not complete, more hints wil follow)
Wednesday, August 22, 2007
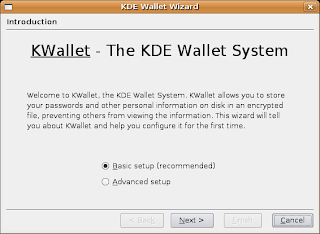
How to remove Kwallet
Finding Kwallet annoying?
Having problems removing applications from using it no matter what you do?
I tried following the following thread, only having the wallet database completely screwed up (KDE/gnome compatibility issue?):
http://www.mail-archive.com/debian-kde@lists.debian.org/msg26772.html
I.e. do not install kwalletmanager if youre running gnome (i.e. Ubuntu). Instead do the following (replace kopete with whatever app. you need kwallet removed from).
First of all make sure the app in question is not running and restart the X session just to make sure no processes are still alive that will rewrite/corrupt the files you will remove below. Now:
cd ~./kde
find . -name "*kwallet*" -exec rm -rf '{}' ';'
find . -name "*kopete*" -exec rm -rf '{}' ';'
After that start the app. If/when the kwallet wizard starts again it's important that you run it, but select that you don't want to use kwallet for that app. The dialogs should look like this:
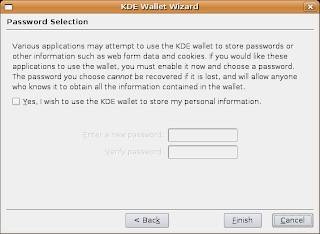
Note that the check-box should not be enabled above.
Having problems removing applications from using it no matter what you do?
I tried following the following thread, only having the wallet database completely screwed up (KDE/gnome compatibility issue?):
http://www.mail-archive.com/debian-kde@lists.debian.org/msg26772.html
I.e. do not install kwalletmanager if youre running gnome (i.e. Ubuntu). Instead do the following (replace kopete with whatever app. you need kwallet removed from).
First of all make sure the app in question is not running and restart the X session just to make sure no processes are still alive that will rewrite/corrupt the files you will remove below. Now:
cd ~./kde
find . -name "*kwallet*" -exec rm -rf '{}' ';'
find . -name "*kopete*" -exec rm -rf '{}' ';'
After that start the app. If/when the kwallet wizard starts again it's important that you run it, but select that you don't want to use kwallet for that app. The dialogs should look like this:


Note that the check-box should not be enabled above.
Monday, June 11, 2007
ODOA - Or how lines are ended
This is not a strict Ubuntu issue but a general issue concerning operating systems and protocols.
Unix uses newline (or linefeed, '\n' = 012 = 0x0A) to terminate lines in text files;
DOS uses carriage return + linefeed ("\r\n" = 015 + 012 = 0x0D + 0x0A), and (AFAIK)
MacOS uses only carriage return ('\c'
= 015 = 0x0D).
Or...
Unix = 0x0A
DOS = 0x0D 0x0A
TCP = 0x0D 0x0A
Mac = 0x0D
Read more at: http://en.wikipedia.org/wiki/Line_feed#Newline_in_programming_languages
Note that \n in the C-language is dependant of the underlaying OS and operational mode for opened files.
Monday, May 14, 2007
Screenshots
Sometimes a picture says more than a thousand words. Taking a screen-shot of your desktop might make it easier to communicate a problem.
Ubuntu runs the gdm windowing system and you have the ability already built in.
(The program is called gnome-screenshot and is part of the package gnome-utils in case it's not pre-installed with your distribution and you have to install it.)
To take a screen-shot, just hit:
* Print Screen - Takes a screen-shot of the entire screen.
* Alt+Print Screen - Takes a screen-shot of the window to which the mouse points.
Friday, January 19, 2007
Apache proxy issues
(from http://httpd.apache.org/docs/trunk/mod/mod_proxy.html#access)
"Strictly limiting access is essential if you are using a forward proxy (using the
I.e. This should be OK
proxy.conf:
Order deny,allow
Deny from all
#Allow from .your_domain.com
ProxyPass /viewcvs http://localhost:8080/viewcvs/
ProxyPassReverse /viewcvs http://localhost:8080/viewcvs/
"Strictly limiting access is essential if you are using a forward proxy (using the
ProxyRequests directive). Otherwise, your server can be used by any client to access arbitrary hosts while hiding his or her true identity. This is dangerous both for your network and for the Internet at large. When using a reverse proxy (using the ProxyPass directive with ProxyRequests Off), access control is less critical because clients can only contact the hosts that you have specifically configured."I.e. This should be OK
proxy.conf:
Order deny,allow
Deny from all
#Allow from .your_domain.com
ProxyPass /viewcvs http://localhost:8080/viewcvs/
ProxyPassReverse /viewcvs http://localhost:8080/viewcvs/
more CVS trixs
To start a new project
1) Copy a premade empty repository directory and point your CVSROOT to it.
2) cvs co .
3) cvs add
No need to fuzz with CVS import & init and stuff, which actually would make the next tip impossible (or very hard at best).
Backup your servers settings ()
su root
cd /
cvs co -p .
cvs_addall etc
cvs_addall root
cvs add usr
cd usr
cvs add lib
cd lib
cvs add yp
cd yp
cvs add *
cd /var/yp
cvs add Makefile
cd ..
cvs add geoipDB.txt #In case you have this file i.e.
cvs add log
cd log
cvs add apache2
cd apache2
cvs add access.log
cd ..
cvs add auth.log
cd /
cvs commit -m "System initial mirror"
To prune CVS out from an existing directory:
cd
find . -type d -name CVS -exec rm -rf '{}' ';'
BIG FAT NOTE
If you put the whole /etc/ in repo, some services might not start because they object finding a file CVS in some of it's directories. You must then use the above command line to remove the directories.
Since you're only going to go one way (i.e. to the repo) and never go from the repo (exept when diffing), you can just check out the offending module/subdir again. Any changes made locally "should" be merged with the ones in repo.
Alternative (and safer), you can rename the CVS dirs to .CVS. Prefixing with a dot is a convention to "hide" stuff, and most services should not be offended by any "hidden" directories.
Services known to be offended by CVS directories:
Therefore before you reboot your machine, repeat the following on each directory above:
cd /etc
mdrename.sh CVS .CVS
1) Copy a premade empty repository directory and point your CVSROOT to it.
2) cvs co .
3) cvs add
No need to fuzz with CVS import & init and stuff, which actually would make the next tip impossible (or very hard at best).
Backup your servers settings (
su root
cd /
cvs co -p
cvs_addall etc
cvs_addall root
cvs add usr
cd usr
cvs add lib
cd lib
cvs add yp
cd yp
cvs add *
cd /var/yp
cvs add Makefile
cd ..
cvs add geoipDB.txt #In case you have this file i.e.
cvs add log
cd log
cvs add apache2
cd apache2
cvs add access.log
cd ..
cvs add auth.log
cd /
cvs commit -m "System initial mirror"
To prune CVS out from an existing directory:
cd
find . -type d -name CVS -exec rm -rf '{}' ';'
BIG FAT NOTE
If you put the whole /etc/ in repo, some services might not start because they object finding a file CVS in some of it's directories. You must then use the above command line to remove the directories.
Since you're only going to go one way (i.e. to the repo) and never go from the repo (exept when diffing), you can just check out the offending module/subdir again. Any changes made locally "should" be merged with the ones in repo.
Alternative (and safer), you can rename the CVS dirs to .CVS. Prefixing with a dot is a convention to "hide" stuff, and most services should not be offended by any "hidden" directories.
Services known to be offended by CVS directories:
apache2 - - modprobe.d - This will create a bunch of error entries in system log but is otherwise harmless.
Therefore before you reboot your machine, repeat the following on each directory above:
cd /etc
mdrename.sh
Tuesday, January 16, 2007
NIS and NFS services
(Please read this post first: http://michael-ambrus-tipps.blogspot.com/2006/11/nis.html)
This contains minimum information to set up NIS and NFS services.
NFS
1)
make sure you have the nfs-kernel-server package installed and running
2)
Add this entry in the file /etc/exports
/home 192.168.0.0/255.255.255.0(rw)
NIS
1) Modify the file /var/yp/Makefile to the following:
*)
< MINUID=1000
< MINGID=1000
---
> MINUID=4
> MINGID=500
*)
< MERGE_PASSWD=false
---
> MERGE_PASSWD=true
*)
< merge_group="false"
---
> MERGE_GROUP=true
*)
< ALIASES = /etc/aliases
---
> ALIASES = /etc/aliases.yp
*)
< GROUP = $(YPPWDDIR)/group
< PASSWD = $(YPPWDDIR)/passwd
---
> GROUP = $(YPPWDDIR)/group.yp
> PASSWD = $(YPPWDDIR)/passwd.yp
3) The NIS domain
(This differs from other distributions)
Set the NIS domain in the file /etc/defaultdomain
ypdomain.logiccroft.de
4) Configure NIS service to be a server
Edit the file /etc/default/nis
NISSERVER=master
You might consider setting
NISCLIENT=false
..but you can leave it until were done testing.
If you do want to test the domainserver locally, you'll have to add the followin line in /etc/yp.conf:
ypserver 192.168.0.2
(Please use the IP number and not IP name for security reasons and for ease of setting up and usa in case nameservice is broken).
5) build the service database
cd /etc
cp aliases aliases.yp
cp group group.yp
cp passwd passwd.yp
(edit each destination file above and remove unwanted entries)
cd /usr/lib/yp
./ypinit -m
6) Test the service locally - Optional
/etc/init.d/nis stop
/etc/init.d/nis start
ypcat passwd
7) Test the service on a client
Log in as root on the client and:
/etc/nfs stop
/etc/nfs start
/etc/nis stop
/etc/nis start
Repeat the process as in 6)
Setting up a new server (2) - Basic network setup
To minimize the efforts on each client, the new server is about to take over the services as the old one did. That includes having the same IP and the same name on the network.
1) Open the Network Settings wizard (Administration->Networking)
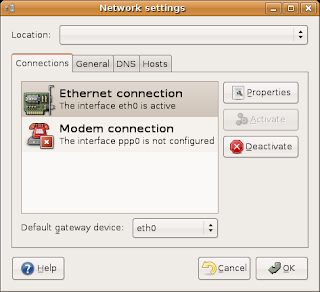
2) Click the button properties and fill in as below
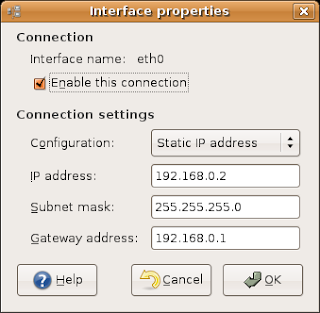
On our network we have a DSL modem that normally provides clients with IP addresses, but in our case we want services to be accessible from the outside and we need a fix address.
Please note that we need the "Gateway address" to be filled in (this has to do with that gateways today don't normally follow standard by placing themselves on the networks last address which in our case would be 192.168.0.254)
3) Change the name to the old servers name
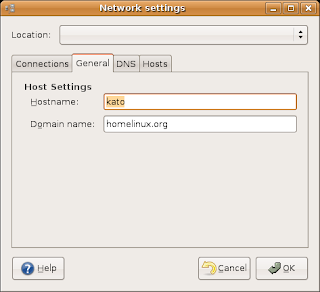
4) DNS setting
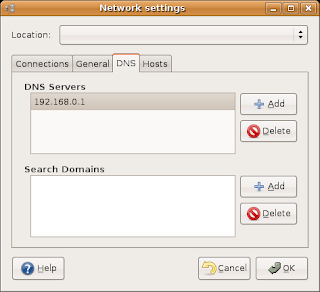
Our router provides a DNS proxy. Enter the address of the router as a DNS server and we don't need to update this setting each time the router reboots (or the ISP changes their setting)
Monday, January 15, 2007
Debugging crashing modules
Usefull commands:
cat /proc/kmsg
dmesg
depmod
modprobe
insmod
rmmod
Usefull files:
/etc/discover.conf # Automatic HW detection and module loaing (new)
/etc/modules #Mention module for auomatic loading
/etc/modprobe.d/ #Options
cat /proc/kmsg
dmesg
depmod
modprobe
insmod
rmmod
Usefull files:
/etc/discover.conf # Automatic HW detection and module loaing (new)
/etc/modules #Mention module for auomatic loading
/etc/modprobe.d/
sysrq - crashmanager
( /usr/src/linux-source-/Documentation/sysrq.txt )
echo "1" > /proc/sys/kernel/sysrq
This will enable the following:
'r' - Turns off keyboard raw mode and sets it to XLATE.
'k' - Secure Access Key (SAK) Kills all programs on the current virtual
console. NOTE: See important comments below in SAK section.
'b' - Will immediately reboot the system without syncing
or unmounting your disks.
'c' - Will perform a kexec reboot in order to take a crashdump.
'o' - Will shut your system off (if configured and supported).
's' - Will attempt to sync all mounted filesystems.
'u' - Will attempt to remount all mounted filesystems read-only.
'p' - Will dump the current registers and flags to your console.
't' - Will dump a list of current tasks and their information to your
console.
'm' - Will dump current memory info to your console.
'v' - Dumps Voyager SMP processor info to your console.
'0'-'9' - Sets the console log level, controlling which kernel messages
will be printed to your console. ('0', for example would make
it so that only emergency messages like PANICs or OOPSes would
make it to your console.)
'f' - Will call oom_kill to kill a memory hog process
'e' - Send a SIGTERM to all processes, except for init.
'i' - Send a SIGKILL to all processes, except for init.
'l' - Send a SIGKILL to all processes, INCLUDING init. (Your system
will be non-functional after this.)
'h' - Will display help ( actually any other key than those listed above will display help. but 'h' is easy to remember :-)
Sunday, January 14, 2007
Video44 using bttv chrashes
... or how to disable modules at boot-up.
I have an old PCI TV card, BT848A video (MIRO PCTV). This card does not have any circuits for audio sample grabbing, and any video4linux application like xawtv, wmtv or kdetv will break on the module tvaudio.ko (the module video seems dependant of it).
We want to disable loading of this and that can be done by adding the following line in /etc/discover.conf
skip tvaudio
( tip from: http://www.webservertalk.com/message173405.html )
Originally no player could control the card. Detecting which card was used and which module (and parameters) were used using the command:
xawtv -hwscan
We got some information about a generic card beeing used. So I added (in the file /etc/modules):
bttv
And the file /etc/modprobe.d/tv was added including the following line:
options bttv card=1 radio=0 tuner=0 gbuffers=15
I'm not certain about the radio option, but it doesnt seem to matter. The module tvaudio does however...
Instead I used the analog cable and connected it to a free analog input on the MB. Now we only need to figure out how to make VLC mix in this audio-streem so that we can broadcast the whole thing ;)
Setting up a new server
I was setting up a new server to replace the old one. This post contains notes for that.
* Temporary enable root to access ssh
/etc/ssh/ssd_config:
PermitRootLogin yes
The following config files are copied to the new server as *.kato and are to be used to get the settings specific (and only the specific things, not the whole thing).
/etc/ssh/sshd_config
/etc/samba/smb.conf
/etc/exports
/etc/httpd/conf/httpd.conf
/var/yp/Makefile
/var/yp/ypservers
/var/log/httpd/access_log
/var/log/httpd/access_log.txt
/var/geoipDB.txt
.
UID staring off somewhere else than 1000
On Red Hat UID for normal users (as opposed to processes and services) used to start on 500.
This turns out to be an obsticle when one wants to move the users (their homedirs) from an server based on that convenrion to an Ubuntu (Debian) based server. The following files need correcting and a new pawwd needs to be created with the same UID's as the old ones:
adduser.conf:FIRST_UID=1000
gdm/factory-gdm.conf:MinimalUID=1000
gdm/gdm.conf:MinimalUID=1000
X11/gdm/factory-gdm.conf:MinimalUID=1000
X11/gdm/gdm.conf:MinimalUID=1000
I know NIS and SSH has some issues with this too. Will post more on this topic when I find out.
Sunday, November 19, 2006
Automatic mounting
For automatic mounting of removable devices, the command pmount is used in the background.
For this to work, you seem to need to add each device in a list in the file:
/etc/pmount.allow
I had to do this with a CF over PCMCIA. Nice thing about it though is that you need not modify either /etc/fstab, mount as root or create the mountpoint directory (all these go under /media). pmount figures it all out for you. Please read the manpage for pmount to make sure you follow the policy for your device.
Detect the device by first inserting it, and then invoke the command:
sudo fdisk -l
Copy&paste the device filename and put it into the list. In my case the line was:
/dev/hde1
Do not do as in the following suggestion: http://ubuntuforums.org/showthread.php?t=295036
Saturday, November 18, 2006
dhcp & dns
Beeing on a LAN the inside of a shared Intenet adress, I use the router Netgear dg814 (NAT + other stuff gw/fw).
This one will automagically update dyndns with the shared host and domain name. Furthermore it has a dhcp server that will allow clients on the inside to get dynamic IP adresses.
DNS quries to the outside works very fine since the dhcp forwards the DNS server IP it got when first connected to the DSL node point.
BUT looking up inside adresses is a nightmare. I don't know for sure if the GW can act as a DNS server by itself and use the "attached divice list" some how. One mashine on the inside acts a NIS server and could distribute this information in turn if not.
But to keep the "attached divice list" in the GW updated, one has to modify the file /etc/dhcp3/dhclient.conf with the entry:
send host-name "yourhostname";
This will make the dhcp client inform the dhcp server of it's hostname. Note that the string is sent "as is" (it would be much nicer if we could get it to send the actual hostname instead).
Additional hints:
http://www.debian-administration.org/articles/255
http://www.debian-administration.org/articles/343
Various "domains"
1)
NIS domin is set in file /etc/defaultdomain (?) in Ubuntu and not as in RH in /etc/sysconfig/networking
The following commands are related to the NIS domain (but not the other types - confusing and important tho know). I think neither of these commands affect the setup and only affect the current session.
domainname - set or display name of current domain
nisdomainname - set or display name of current NIS(YP) domain
ypdomainname - set or display name of current NIS(YP) domain
2)
The IP domain (i.e. network DNS domain) is set in the file /etc/resolv.conf
use the commands hostname -d or dnsdomain to show/set
3)
Windows domain is set in /etc/samba/smb.conf. When using samba filebrowsers on a shared you need special access to, which "domain" to use is selected to the default WORKGROUP name. I havn't figured out how (if possible) to change this.
gdm with multiple NICs
You may experience difficulties to log in with gdm when having more then one NIC in you system. I have two: one normal (eth0) and one build in WLAN (eth1).
Problem is that when booting up without cable plugged in I get only eth1 up (which in itself is OK). I can log in using a local account, but I cannot log in using a NIS account which gives the same symptoms as described in https://launchpad.net/distros/ubuntu/+source/gnome-session/+bug/15443 .
Plugging in the cable and executing /etc/init.d/networking restart will not bring eth0 either.
I deducted the problem being the the file /etc/network/interfaces is missing a line
auto eth0
However, adding this will make start-up very slow if the interface is indeed there, but the cable is missing (which is probably the reason why it was omitted also). Reason why this works in normal case is that, if the interface is there and the cable is plugged in properly, the kernel will bring the interface eth0 up automatically without running 'ifup' (via '/etc/init.d/networking start' i.e.)
Please read comments to this issue for followups...
Friday, November 10, 2006
GUI command line invocation
Some GUI apps command line invocation good to know when NIS user is logged in)
Add/remove
/usr/bin/gnome-app-install
Shared foleders (SAMBA config tool)
gksu shares-admin
Language Support
gksu /usr/bin/gnome-language
Networking
gksu network-admin
Network Tools
gnome-nettool
Add/remove
/usr/bin/gnome-app-install
Shared foleders (SAMBA config tool)
gksu shares-admin
Language Support
gksu /usr/bin/gnome-language
-selector
Services
gksu services-admin
Update Manager
gksu /usr/bin/update-manager
Services
gksu services-admin
Update Manager
gksu /usr/bin/update-manager
Networking
gksu network-admin
Network Tools
gnome-nettool
gdm probs with NIS
You will most likely get a prompt for each user you try to log in saying something like this:
Authorities for file ~/.dmrs is not 0644... will not be able to save...
The text is misleading, and setting the file with the given permission bits will not help.
What seems to help is if you set your ~/ to 0700 and ~/.dmrc to 0600.
Try also experimenting with the file /etc/gdm/gdm.conf. Look up the lines:
# 0 is the most restrictive, 1 allows group write permissions, 2 allows all
# write permissions.
RelaxPermissions=0
Setting RelaxPermissions=1 might help...
NIS
On Ubunto when setting up NIS following normal procedures will lead to that you can read ypcat passwd, but you still can't log in.
The following is needed additionally:
Last line in /etc/passwd:
+::::::
Last line in /etc/group:
+:::
Check that /etc/nsswitch.conf contains the following:
passwd: compat
group: compat
shadow: compat
hosts: files nisplus nis dns mdns
The following is needed additionally:
Last line in /etc/passwd:
+::::::
Last line in /etc/group:
+:::
Check that /etc/nsswitch.conf contains the following:
passwd: compat
group: compat
shadow: compat
hosts: files nisplus nis dns mdns
Configure X - 1'st stumbling steps
On Ubuntu, your X is probably not configured properly from the beginning.
Check in /etc/X11/xorg.conf
Section "Device"
Identifier "Whattever"
Driver "i810" <-- Might say VESA or something else default
Also check that your driver is really installed on your system:
ls /usr/lib/xorg/modules/drivers/
:
i810_drv.so
:
(Change "i810" above to whatever is apropriate for your system, nvidia e.t.a.)
gdm and bash
On Ubuntu ~/.bash_profile is not run when you log in via gdm.
Edit (possibly add) the file: ~/.xprofile with the following:
. ~/.bash_profile
Edit (possibly add) the file: ~/.xprofile with the following:
. ~/.bash_profile
Subscribe to:
Posts (Atom)
